Apple Pie Cinnamon Rolls

It’s been too long, friends. I’m back with another cinnamon roll recipe perfect for the holiday baking season. This pastry was born when I had too much filling leftover after I baked an apple pie. Am I the only one who always has leftover filling? Anywaythey turned out beautifully with the tartness of the apples adding some nice complexity to the usual simple sweetness of cinnamon rolls. Bring these to an office potluck or serve them for breakfast on Christmas morning and be everybody’s new best friend.

Image

Apple Pie Cinnamon Rolls

2 1/2 tsp. active dry yeast

1/2 cup sugar

1 cup warm non-dairy milk (I used soy)

1/4 cup melted earth balance, other non-hydrogenated margarine, or canola oil

1 tsp. baking powder

1 tsp.canola oil

3 tbs. water

4 1/2 – 5 C. all-purpose flour

1/4 tsp. salt

1/2 teaspoon ground cinnamon

For the filling:

2 granny smith apples, peeled, cored and chopped into rough 1/2 inch chunks

1/3 cup earth balance, softened

1/3 cup brown sugar

1 tablespoon canola oil

2 tablespoons maple syrup

1 tablespoon ground cinnamon

1 teaspoon ground nutmeg

1/2 teaspoon ground allspice

1/4 teaspoon ground ginger

pinch cloves

To prepare the dough: 

Dissolve the yeast and sugar into the milk. Let stand until foamy. Meanwhile, whisk together the baking powder, water and canola oil. Add the baking powder mixture and melted margarine to the yeast mixture and stir. In a separate bowl, sift together the flour and spices. Gradually add the the wet ingredients until a non-sticky dough forms. Knead dough on a floured surface for about ten minutes until it’s stretchy and smooth. (You can also use a stand mixer fitted with a dough hook.) Form dough into a ball, place in an oiled glass bowl, cover and let rise in a warm place for about an hour, or until doubled in size.

Prepare the filling: Toss apple chunks with the canola oil and maple syrup. Cream brown sugar, earth balance, and spices together in a small bowl until well combined. Add the apple mixture to the brown sugar mixture and toss to coat apples.  Preheat your oven to 400 F and lightly grease a heavy cookie sheet.

Image

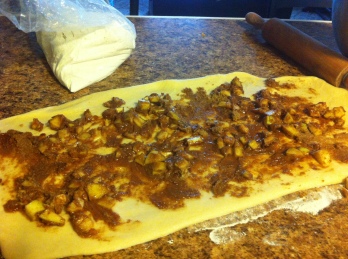
pre-rolling

Punch down the prepared dough onto a floured surface and roll into a 15 x 9 inch rectangle. Drop the filling into the center of the rectangle. Use the back of a spoon to spread the filling evenly over the surface of the dough, leaving 1 inch “margins” around the perimeter.

Roll dough into a cylinder lengthwise and slice into 12 pieces. Place evenly on the prepared cookie sheet and let rise for an additional 15 – 20 minutes. Cover and place in the fridge until ready to bake, or progress immediately to the baking step if you want them right away!

Bake for 12 – 15 minutes until lightly browned on the bottom. Drizzle your favorite icing over the rolls while they’re still warm, if you like, but I prefer them in their naked state. These are best served immediately, but keep well for a couple of days stored in an airtight container.

NYC Vegan Eats: Part 1

As an early birthday present from my husband, I got to embark on a two day jaunt to New York City last week. One of the things I miss most about life in the City is easy access of some of the world’s best food, vegan or otherwise. Every time I visit, I make sure to squeeze in as much deliciousness as my wallet and stomach can afford. Even though this trip was short, I still got to visit a few old and new favorite vegan restaurants. In hind sight, I should have taken some more photos of what I ate, but I always feel super awkward photographing plates (and, to be honest, I forgot).

My first stop (literally, right off the bus) in the city was ‘sNice in the west village, home of the Vegan Panini, one of my all-time favorite sandwiches. I first met the Vegan Panini about five years ago and my love hasn’t wavered  The balance of flavors and textures is perfection in sandwich form. The smoked tofu is firm and chew as all good tofu should be. Sun dried tomatoes add a hint of sweetness while garlicky, creamy pesto bring the whole thing together on a crusty baguette.   My oldest,closest friend and I enjoyed our panini as we caught up on each other’s lives. I also got to introduce her to my almost four month old son!

Later that night, I met a few friends for dinner at Red Bamboo in Greenwich Village. I’d only eaten here once before, my freshman year of college, and figured it was time for a return. Red Bamboo and its sister restaurant, Vegetarian’s Paradise 2, are NYC vegan staples. Soul food and Asian-inspired cuisine both have their place on Red Bamboo’s expansive menu. It’s a little heavier on the mock meats than I usually prefer, but I do have a soft spot for mock chicken. We started with the vegetable dumplings, which were good, but nothing to write home about. Unable to decide what to order, I ended up sharing the sesame beef and cashew chicken with a friend. The sesame beef was the favorite of the night–it tasted just like the Chinese-American takeout dish I remembered from childhood–with crispy morsels of soy-based protein, lightly fried and smothered with a delicious sesame sauce, served alongside a hearty helping of veggies and brown rice. We finished the meal with a dish of chocolate and vanilla ice cream to share. I enjoyed the food, but I probably won’t go out of my way to eat here again. Soy and Sake still wins as my favorite place for vegan pan-Asian food in the city.

Part 2 coming tomorrow: The Cinnamon Snail and Peacefood Cafe

Cookie Butter

First of all, maybe I should stop pretending to be doing VeganMoFo and just admit that I’m blogging only slightly more frequently than I might usually during the month of October. I’ve been traveling, taking care of some personal stress, and spending most of the baby’s short nap times working on a creative writing project. So, writing about sandwiches has fallen by the wayside and I’m not going to apologize.

Now that we’ve got that out of the way. . .

Cookie butter. It’s my new favorite.

A few weeks ago, a Trader Joe’s opened in my area (about an hour and a half’s drive from me, but still) and I could hardly wait to visit. When we lived in Manhattan, Trader Joe’s allowed me to purchase specialty vegan items and occasional prepared foods without going broke. This visit, I picked up a jar of cookie butter, a spread made from Speculoos after a friend insisted it would change my toast-eating life. I’m now addicted.

Imagine cinnamon graham crackers with the texture and consistency of peanut butter and you’ll have a rough idea of how cookie butter tastes. So far I’ve mostly eaten it on toast and with apples. I know it’s pretty popular in vegan circles these days, so please, readers, tell me what to do with my cookie butter, besides eat it straight from the jar with a spoon.


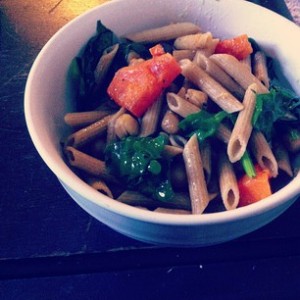
A Simple Fall Pasta

We eat a lot of pasta around here. When my husband and I were first married, he claimed to hate pasta, mostly because he hated pasta sauce. I started serving it to him with a simple garlic-lemon sauce, lots of herbs and fresh veggies and now he eats it so often we call it “Pasta Graham.”

A couple of days ago, I roasted a butternut squash with lots of salt and black pepper, but had no main course prepared and limited time. I ended up tossing it with whole wheat penne noodles, fresh spinach and chickpeas, topped with my usual lemon-garlic-olive oil sauce and plenty of crushed red pepper.


Simple, nutritious, and satisfying on a crisp autumn day.

Paula Deen Goes Vegan #1: Banana Coffee Muffins

Let’s ignore the fact that I’m failing the whole “post every day” part of VeganMoFo and move on to the muffins.

For my first Paula Deen challenge, I decided to forego the deep fried, bacon-wrapped, lard-marinated butter balls and go with something simple–these banana coffee muffins.

The only animal ingredients in these are, as in many baked goods, eggs and butter. I replaced the egg with 1/3 cup of soymilk whisked with 1 tsp. apple cider vinegar.  Since bananas already act as a binder, I figured I mostly needed to replace the moisture and leavening components an egg provides. For the melted butter, I substituted canola oil. While I appreciate earth balance and other vegan “butters”, I also like to use minimally processed ingredients, when possible. I used whole wheat pastry flour because I ran out of all-purpose, and replaced the nuts with chocolate chips, because my husband loves chocolatey-banana things and who am I to stand in the way of that love?

The result: Good, but not perfect. I’m a big fan of the marriage of banana, coffee and chocolate and these taste just decadent enough to feel like a treat without being overwhelmingly rich. Really nice paired with a homemade latte!

The biggest problem with the recipe was that they didn’t rise much or get fluffy the way a muffin usually would. I think the soy milk made the batter a little too wet, which I could have counteracted by adding a bit more flour. Next time, I will also try adding a teaspoon or so of baking powder, which should help leaven them a bit more. I may cut back on the oil by a tablespoon or two because I thought they tasted pretty greasy. But this is a Paula Deen recipe we’re talking about, so maybe that’s intentional.


Veganizing a recipe almost always takes trial and error but I’m enjoying the challenge! Next time I think I’ll tackle a more ambitious Paula recipe–maybe an entree?

Not!Meat Loaf

Continuing with the accidental comfort food theme of this month, I whipped up a vegetarian meatloaf for dinner last night. I’ve never tasted “real” meatloaf (my husband claims this makes me less of an American) so I’m not sure what it’s supposed to taste like, but my Not!Meat Loaf turned out fairly well! The meatloaf loving husband polished off about three servings all by himself, so we’ll call it a success.

Long ago, in my early teenage vegan years, I used to make a veggie meatloaf from the fabled magical loaf studio. They always came out okay, but kind of like something your weird hippy aunt would serve. This time, I used the meat loaf recipe from Quick and Easy Vegan Comfort Food with a few modifications:

1.We were low on ketchup so I replaced half of the 1 1/2 cups called for in the recipe with a combination of tomato paste and sriracha sauce. The sriracha makes it quite spicy, unlike a traditional meatloaf, which we appreciated.

2. I used green onion instead of red and added about a 1/2 cup of chopped carrots, just   because.

One of the things I love most about the recipes in Quick and Easy Vegan Comfort Food are their adaptability. Unless I’m thinking ahead and remember to check ingredient lists before I go shopping, I almost always end up subbing or swapping ingredients in recipes, based on what I have on hand. This meat loaf stood up to the challenge. It’s also fairly healthy, as far as meat loaf goes with lots of fresh veggies, soy protein and only a small amount of oil.

Next time I make this, I may try forming the dough into patties for veggie burgers.

Tomorrow’s VeganMoFo post: veganized banana coffee muffins,  courtesy of Paula Deen!

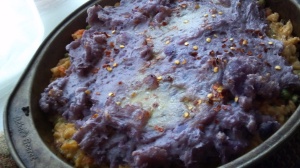
Smurf’s Shepherd’s Pie

Today was cold and rainy, just perfect for the warmth and comfort of an old fashioned shepherd’s pie. The only potatoes I had on hand happened to be blue potatoes we picked up from our co-op last week, so my husband and I dubbed this casserole, “Smurfy Shepherd’s Pie” even though the insides of the tubers are more purple than blue. Go with it! Authentic shepherd’s pie usually uses some kind of sherry (I think? Brits, help me out here) but I didn’t have any kind of cooking wine on hand, so I winged it with some broth and red wine vinegar in the gravy. TVP provided a perfect, meaty base for the pie. I bet cooked brown lentils would work well, too. It doesn’t look like much, because I’m a horrible food photographer, but it turned out perfectly.  I have a feeling this shepherd’s pie (smurfy or otherwise) will make regular appearances on our dinner table in the chilly winter months to come.

Smurf’s Shepherd’s Pie (serves 4) 

Topping:

2 lbs blue potatoes, peeled and chopped into chunks

3 tablespoons earth balance

1/4 cup vegetable broth

2 teaspoons sea salt

1 teaspoon coarse black pepper

1 teaspoon crushed red pepper (optional)

Stew:

1 1/2 cups dehydrated TVP chunks

1 cup boiling water

2 tablespoons olive oil

1 teaspoon

1 small onion, diced

1/2 cup carrots, coined

3/4 cup cooked peas (I used thawed, from frozen)

1 clove garlic, minced

2 cups vegetable stock

1/4 cup nutritional yeast

1/4 cup red wine vinegar

2 tablespoons all-purpose flour

1 tablespoon melted earth balance, or canola oil

1/2 teaspoon dried rosemary

1/2 teaspoon dried oregano

salt and pepper to taste

our boiling water over TVP and let soak for approximately 10 minutes, or until most of the water is absorbed. Meanwhile, bring a pot of salted water to a boil. Add the potatoes and simmer until tender. Drain. As the potatoes are cooking, prepare the stew.

Whisk together the vegetable broth, red wine vinegar, nutritional yeast, flour and melted EB/oil. Heat olive oil in a large pan (preferably cast iron) over medium heat. Add the onions and cook until translucent. Add the carrots, peas, garlic and TVP. Cook until the TVP is lightly browned and the carrots are softened. Add the vegetable broth mixture, stir, and let simmer for about 5 minutes, stirring occasionally until the stew appears thick and creamy. Add splashes of water or broth as necessary to keep from sticking. Taste and add salt and pepper as desired. Turn on your broiler.

Now finish preparing the topping. Mash together the potatoes, 2 tablespoons of the earth balance, broth, salt and black pepper. I use the whipping attachment of my stand mixer for this step. Transfer the stew to an oven safe casserole dish or pie plate. Spoon the potato mixture over top in a single, even layer. If you used cast iron to prepare the stew, no transferring is required! Top the pie with the additional tablespoon of earth balance and the crushed red pepper. You could also add some shredded vegan cheese on top, if you’re into that sort of thing.

Broil for 5 minutes or until the top is nicely browned. Serve hot.

Gingerbread Cinnamon Rolls

Cinnamon rolls are best eaten while wearing flannel pajamas and fuzzy slippers in front of a roaring fireplace. They’re the Thomas Kinkade paintings of baked goods. I mean, I’m not trying to encourage emotional eating, but if you’ve had a tough day, you probably need a cinnamon roll.

 In my family, cinnamon rolls were a Christmas morning tradition. These days, I’ll find any excuse to whip up a batch as soon as the weather starts cooling (it just feels wrong to eat a sticky, sweet baked good in mid-July). After some successful pumpkin cinnamon rolls last season, I started thinking about how to marry other autumn and winter flavors to my favorite recipe. This time: gingerbread.

I used my basic cinnamon roll recipe, veganized from the one I grew up making with my mom. The molasses and powdered ginger in the dough add the “gingerbread” taste, but I think it’s a little too understated in this version. More molasses, maybe? Another spice addition, like ground cloves? Try it and let me know what you think. I think a good cream cheese  frosting would be awesome on these, but today I opted for topping these babies with a simple vanilla icing.

Gingerbread Cinnamon Rolls (a work in progress)

For the dough:


2 1/2 tsp. active dry yeast

1/2 cup sugar

1 cup warm non-dairy milk (I used soy)

2 tbs molasses

1/4 cup melted earth balance or other non-hydrogenated margarine

1 tsp. baking powder

1 tsp.canola oil

3 tbs. water

4 1/2 – 5 C. all-purpose flour

1/4 tsp. salt

2 tsp. ground ginger

1/2 teaspoon ground cinnamon

For the filling:

1/3 cup earth balance, softened

1/3 cup brown sugar

1 tablespoon ground cinnamon

1 teaspoon ground ginger

1/4 teaspoon nutmeg (optional)

To prepare the dough: 

Dissolve the yeast and sugar into the milk. Let stand until foamy. Meanwhile, whisk together the baking powder, water and canola oil. Add the baking powder mixture and melted margarine to the yeast mixture and stir. In a separate bowl, sift together the flour and spices. Gradually add the the wet ingredients until a non-sticky dough forms. Knead dough on a floured surface for about ten minutes until it’s stretchy and smooth. (You can also use a stand mixer fitted with a dough hook.) Form dough into a ball, place in an oiled glass bowl, cover and let rise in a warm place for about an hour, or until doubled in size.

Prepare the filling by creaming all ingredients together in a small bowl until well combined. Preheat your oven to 400 F and lightly grease a heavy cookie sheet.

Punch down the prepared dough onto a floured surface and roll into a 15 x 9 inch rectangle. Use a butter knife or the back of a spoon to spread the filling over the surface of the rectangle. Roll dough into a cylinder and slice into 12 pieces. Place evenly on the prepared cookie sheet and let rise for an additional 15 – 20 minutes. Cover with shrink wrap and place in the fridge until ready to bake, or progress immediately to the baking step if you want them right away!

Bake for 12 – 15 minutes until lightly browned on the bottom. Drizzle your favorite icing over the rolls while they’re still warm. These are best served immediately, but keep well for a couple of days stored in an airtight container.

Cold Oatmeal and Food Ruts

Image

I’m sitting here in my bathrobe, eating lukewarm oatmeal for dinner because it’s 10pm and the cupboards are mostly empty and the idea of cooking, and having to wash more dishes, makes me want to run screaming from my home and adopt a primitive, nomadic, dish-less lifestyle worthy of a TLC reality show. I haven’t had a chance to get to the grocery store this week and over the past too distracted by other responsibilities–taking care of the baby, running a business–to plan meals in advance like I usually do.

In situations like this one, I end up in a food rut, falling back on the same three or four unexciting dishes until either my husband or I start complaining enough to motivate me to get to the store. This week, we’ve mostly been eating peanut butter toast, some combination of lentils and rice, and a mediocre vegetable soup made from last week’s leftover produce haul.

I guess the point of this post is that I’m shaping up to be a sad, uninspiring food blogger. What are your token “in a food rut” meals? What do you do to break out of your ruts? 

Also, this oatmeal isn’t half bad: brown sugar, cinnamon, peanut butter, chocolate chips. Give it a try next time you find yourself standing in your kitchen in your bathrobe, with low blood sugar, staring at a nearly empty fridge. 

Broccoli: A Love Story

Broccoli and I go way back. Its held my heart in its delicious green hands for years.  I may have the occasional fling with a bunch of brussell sprouts or fall prey to the allure of an eggplant now and then, but broccoli is my vegetable soul mate. Its my dependable dinner-time staple, delicious   as a vehicle for a fancy sauce, or all on its own.

© Euclidus | Stock Free Images

My go-to basic roasted broccoli recipe is inspired by a side dish at  my favorite NYC cafe, ‘sNice. In college, I spent many winter nights at a corner table in their west village location sipping a glass of earl grey tea and munching on this broccoli while I studied. I like it best served hot, but it’s also good cold on top of salads or in wraps. This recipe is nothing special, but that’s what makes it so wonderful. It’s subtle enough to act as a side dish to a heartier entree, but bold enough to stand up as a main dish when mixed with lentils or chickpeas and served with your favorite grain.

Garlicky Roasted Broccoli 

Ingredients:

4 cups broccoli florets

2 tablespoons olive oil

1/2 teaspoon lemon juice

1 teaspoon sea salt

1 teaspoon fresh ground coarse black pepper

1/2 – 1 teaspoon crushed red pepper flakes (adjust according to spice preference)

2 teaspoons fresh garlic, minced

Method: 

Preheat oven to 375 F. In a mixing  bowl, toss the broccoli with the olive oil to coat. Add spices and garlic and toss again until well-distributed. Spread the broccoli on a heavy duty baking sheet or large cast iron pan in a single layer. Roast in oven for 15 – 20 minutes, until the broccoli is just starting to brown (be careful not to over cook). Turn on the broiler and broil for 2 minutes. Serve hot or chilled.

While you’re waiting for your broccoli to roast, check out my friend Hayley’s video, all about the magical world of broccoli.